I knew I didn't want the original control panel, since it's quarter-inch metal with holes already drilled in the wrong place. I took off the latch hooks and the pins to help fasten it to the cabinet and tossed the rest.
Also, since the cabinet isn't wide across, I decided I'd have to create two separate control panels. One would have two 8-way joysticks and lots of buttons; the other would have a spinner, a trackball, a 4-way joystick and more buttons. That also meant I would have to find a way to quickly, easily and safely swap out these control panels depending on the game we want to play next.
But what to use? I spent an entire afternoon wandering around Home Depot looking for possibilities. It was a good trip, as I also came up with the idea of a grounding block and found certain cable straps and fasteners I wouldn't have thought to get otherwise.
I was still coming up blank on my search for control panel material and was about ready to settle on a stair plank when I noticed the kitchen cabinets. A little more wandering and I found the Formica kitchen counter tops. These were perfect -- thick and sturdy with a curved lip on the front. Way too big, but two control panels could be cut from one $15 length. Perfect.
At this point I knew I would have to call upon my father for help. He's got a basement full of professional woodworking equipment. I knew my $30 jigsaw wasn't a good bet to complete this task, especially with me controlling it.
I did make exact measurements, and I charted out a template with exact locations. I bought a 1-1/8 inch drill bit -- buy two if you're doing a cab with a lot of holes, because they dull on this Formica stuff.
First we cut the panels to size. Then came the toughest cut. Think of a kitchen counter, and how it curves in front and has an overhang. We had to cut off the part that overhangs so the panel was completely flat on the bottom, yet curved in front. Actually, it was pretty easy with the right equipment. So was drilling the holes. (By the way, I used No. 10 machine screws to fasten the joysticks. I'm sorry, but I don't remember the inch measurement of the drill bit that works with No. 10 screws.)
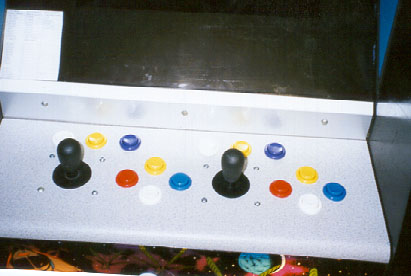
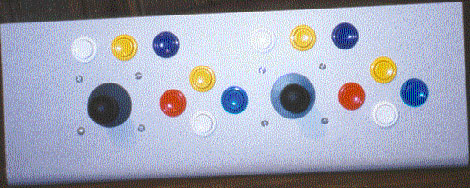
Here is a (pretty darn close to) scale drawing of the control panel layout, followed by a photo:

After getting the buttons and joysticks in place (hint: use the point of the 1-1/8 inch drill bit to spring those e-clips off the joystick shafts), it was time to get down to some soldering.
First, I took handfuls of the wire I pulled out of the cabinet when I gutted it. Then I soldered wires to each of the switches' ground terminals. The other ends, I attached to a 25-terminal ground block. I figured this would make it easy for me to change switches if there were malfunctions.
Then, I had to answer my biggest challenge: How to connect the buttons from two separate control panels through one keyboard input. I had to dink around in CompUSA for an hour to think about it. I didn't want to use an IDE cable because it was too tough to solder. I had looked at other Home Depot-type solutions to no avail. Then, I saw the Belkin 25-pin parallel port extension cable. It was pass-through (no null-modem), so I knew the wires would be easy to trace. I bought two cables and cut them in two. The two male ends were to go onto my two control panels; one of the females was to go to my keyboard encoder. This has proven to be an excellent solution in real gameplay.
I had one more problem, though. I wanted to have live coin slots, plus buttons to emulate coin drops. Also, I wanted the player start buttons on the front of the cabinet for ease of use. These buttons would be in effect no matter which of the two control panels I was using. Also, they weren't part of the actual control panels. So, I decided they should be wired directly to the keyboard encoder, bypassing the Belkin solution. I drilled some holes and did the necessary wiring and soldering. While I was in there, I installed two small Radio Shack momentary switches and hooked them to computer power on and reset.
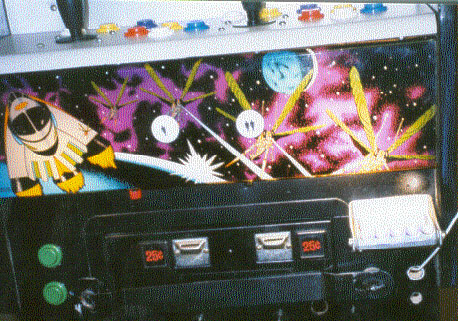
Here is a picture of the front of the cabinet showing these permanent buttons. The 1 and 2 player ones are obvious; green are coin 1 and coin 2; you can barely see the red computer on button and it's hard to see the black reset button to its right. The holes on the right were for the infrared keyboard receiver, but I went with the RF one instead so until I get the second control panel built, I'm running my trackball wire through there. They'll be puttied up.
Now, what interface to use? I didn't want to fool around with a joystick hack, and I definitely don't have the soldering skills for a keyboard hack. I spent hours researching the possibilities and talking to others who already had encoders.
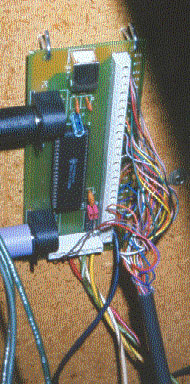
Eventually, I chose Andy Warne's IPAC because it was the one designed specifically for MAME projects. His shipping was quick and the documentation solid, and he later solved one major problem instantly with an e-mail showing me the error of my ways. And the IPAC only costs $47 including shipping from England.
I took Andy's list of which terminals on the IPAC emulated which keystrokes, and matched each up with a specific color of wire from the stripped Belkin cable. VERY CAREFULLY, I wrote these colors on the documentation and hooked it all up (including one wire to the common ground).
Also, I hooked the permanent button wires (coin, player 1 and 2) to the I-PAC and used one of the two IPAC ground terminals as a common ground for those buttons.
I screwed two small cup hooks into the inside left of the cabinet and hung the IPAC on it. Here's how it looks.
The soldering wasn't that hard, once I hit the net to figure out what "NC" and "NO" meant on the Cherry button switches. You want to solder your wires to the "NO" terminal, which means "Normally Open," so that you have to press the button to complete the circuit. Leave the other one alone. (I told you I had a lot to learn.)
Twice I caught myself soldering the wrong color of wire to the wrong button. It helped to write the name of each button on the back of the control panel. The job was over before long.
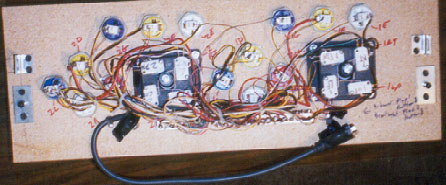
Here are two views of the back of the control panel. Note the location of the hinge clips and pins on the far sides (stolen from the original control panel; I'll have to rig something for panel #2 when I build it). You can see the Belkin cable's end on the right bottom of the top photo. Also note the long grounding block on the bottom of the top photo.

Now, the scary part of the show. I hooked it up, plugged it in, ran MAME and... it ALMOST worked. Not quite, though. Several buttons didn't work. Even the wireless keyboard was fritzing out.
The problem: The Player 1 button, which is used by IPAC to control the functions such as escape, tab, enter, tilde, etc., did not seem to work.
I checked all my wiring, etc., and it appeared good. So I e-mailed Andy Warne and he immediately knew the answer. He told me one of the buttons was shorted or something because IPAC was being forced to think that a button was always being depressed.
I checked and noted that in my clumsy soldering, I had actually melted one of the Cherry switches and its button was locked down. I swapped out that switch from a spare button and tried again...
IT WORKED! Full tilt MAME!
For the record, the first game played was Crazy Climber, followed by a long run of Galaga and some Pengo. Yes it was an all-nighter. But this is nothing compared to the stretch of time I'll play Tempest when I get that spinner panel built.
I love the wireless keyboard as it helps me choose games (although if you learn the letters for each button you can use them to skip around the MAME menu). Also I can surf the Net and whatever else I want using that keyboard. I also can use the trackball for navigating the MAME menu. (by the way I decided to use MAME32 after trying several DOS-based front ends).
That's it, except each of the links on the following page must also serve as a thank you to those people for their help, and to those dozens of uncredited people whose sites I also read, printed out and borrowed ideas from. I only hope I can provide the same service to other MAME cabinet builders. |