I wanted an authentic full-sized cabinet; I didn't want to build one. After snooping around the Internet and asking around at places such as Aladdin's Castle, I was unhappy with the asking prices.
Finally, I started calling arcade game distributors and eventually found one who was willing to sell me a broken game for $50. What's more, he had eight of them and I could pick my favorite! I was there that day and found a very clean MegaZone cabinet. To be safe, I vacuumed it out, wiped it with a tack cloth and then a wet cloth, removed all loose screws or staple-gun staples, and hit it with an overnight dose of bug spray.
Sorry, purists, but even though it had all its innards, I ripped almost everything out. The monitor was junk so I tossed it; the MAME team had the MegaZone ROMS so I threw 'em out. I was planning to put my own monitor in, so after considering using it, I tossed the monitor/ROM bracket.
I also decided against using a TV as the quality simply would not be worth the $150 or whatever in savings.
The only guts that survived made up the electrical power wiring. I connected the main power cord to a new on-off throw switch (in the same spot as the other one which seemed loose) and then to a junction box I installed inside the lower back latching door. Then, I plugged in a heavy-duty power strip which I permanently attached to the left inside wall. The wires for the lights (they all worked!) were spliced to an electrical plug that I plugged into the power strip. So far, so good.
I replaced the speakers and wiring for better sound. I had a good Sony boom box (we have a great outlet store nearby) to use for the sound. I can also listen to radio, tapes and (through the computer) CDs on these speakers while I'm fiddling around on my workbench. I simply use the computer control panel (or Mame's tilde key) to control volume.
Using heavy screws and glue, I installed a piece of heavy particle board (3/4-inch thick, cut to 22.5 inches wide) at a 40-degree angle for the monitor. In case I wanted to remove the monitor in the future, I didn't want it permanently mounted. However, I did take off the front plastic panel from the monitor and gave it six coats of flat-black spray paint.
I figured out that by simply cutting off a 2-by-4 and sliding it in behind the monitor, the monitor wasn't going to budge. 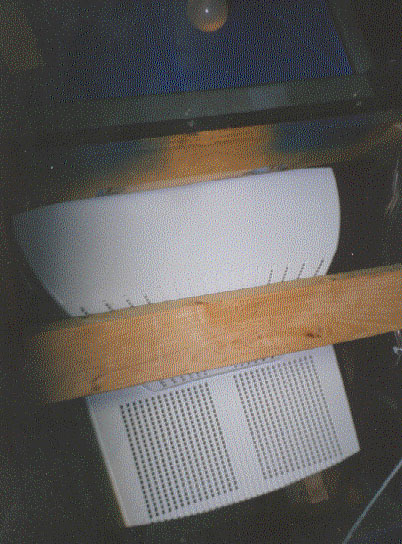 Here's my fancy monitor restraint: a 55-cent two-by-four. For the front bevel I used a $7 piece of flat black foam board from Office Max, carefully cut to size. I used double-sided tape to attach the first smoked Plexiglass bevel "glass" to that foam board, then glued the foam board in place. The main Plexiglass cover then went back where it was.
I took off the control panel and since it's quarter-inch metal wrapped around wood, I knew I'd be starting over there. I didn't use any of the buttons or joystick. The coin door stayed put, as did the marquee. I replaced all three locks (one on coin door, two on back doors); you can get these locks from Home Depot for $6 each.
Next stop: The computer.
|